Learn how to clean gas stove burners at home using simple, natural methods. This step-by-step guide helps remove grease, unclog holes, and restore flame efficiency safely.
Introduction
Gas stoves are used daily in most homes, often multiple times a day. Over time, spilled milk, oil splashes, food residue, and moisture gradually build up on burners. At first, the problem may seem minor—slightly uneven flames or stubborn stains—but if ignored, it can lead to clogged burner holes, yellow flames, gas odor, or delayed ignition.
Many people postpone cleaning burners because the task feels messy or complicated. Others rely on strong chemical cleaners, which can leave residues, damage metal parts, or irritate the skin and lungs. In reality, gas stove burner cleaning at home can be done safely and effectively using simple household ingredients.
This step-by-step guide explains why burners get dirty, what tools you need, and how to clean them thoroughly without harsh chemicals. With regular care, you can improve cooking efficiency, maintain hygiene, and extend the life of your gas stove.
Why Gas Stove Burners Get Dirty
Gas burners are constantly exposed to heat, oil, and moisture. Common reasons for buildup include:
- Oil splatter during frying and tempering
- Food spills that harden with heat
- Moisture trapped after cleaning
- Clogged burner holes due to residue
- Infrequent deep cleaning
When burner holes are blocked, gas flow becomes uneven. This results in weak flames, increased gas consumption, and inconsistent cooking temperatures.
Tools and Natural Materials Needed
You don’t need specialized products. These basic items work well for regular maintenance:
- Baking soda
- White vinegar or lemon juice
- Warm water
- Old toothbrush or soft brush
- Wooden toothpick or pin
- Microfiber cloth or sponge
- Small bowl
- Paper towels
These materials are gentle on metal surfaces and safe for indoor use.
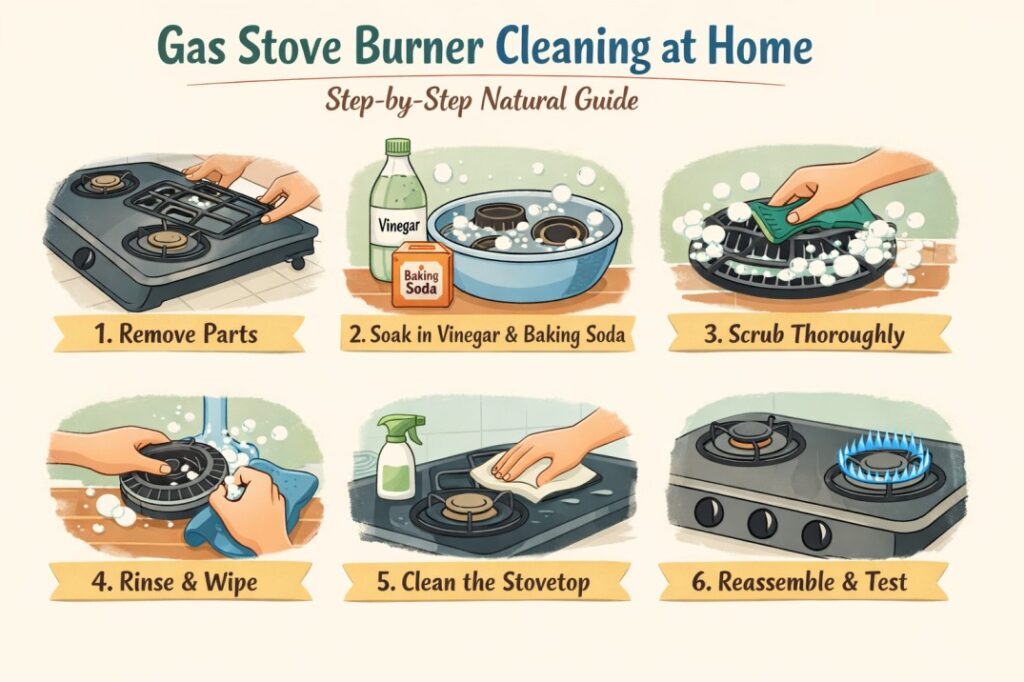
Step-by-Step: Gas Stove Burner Cleaning at Home
Step 1: Turn Off the Gas and Let Burners Cool
Before starting, ensure the gas supply is completely turned off. Allow the stove and burners to cool fully to avoid burns and ensure safe handling.
Step 2: Remove Burners and Burner Caps
Carefully lift off the burners and caps. Place them on a newspaper or towel to prevent spreading grease onto the counter.
If your stove has removable trivets (pan supports), take those off as well.
Step 3: Dry Clean Loose Debris
Use a dry cloth or soft brush to remove loose crumbs, ash, and dry residue. This makes wet cleaning more effective and less messy.
Step 4: Prepare a Natural Cleaning Soak
In a bowl or sink, mix:
- Warm water
- 2 tablespoons baking soda
Soak the burners and caps for 20–30 minutes. Baking soda helps loosen grease and dried food naturally.
For heavy grease, add a splash of vinegar after soaking, not during.
Step 5: Scrub Gently but Thoroughly
Using a toothbrush or soft brush:
- Scrub the burner surface
- Clean the edges and underside
- Focus on stubborn grease patches
Avoid metal scrubbers, as they can damage the burner coating.
Step 6: Unclog Burner Holes Carefully
Use a wooden toothpick or pin to gently clear blocked holes. Do not enlarge the holes—just remove visible debris.
Blocked holes are a common cause of uneven flames, so this step is important.
Step 7: Rinse and Dry Completely
Rinse burners with clean water and shake off excess moisture. Pat dry with a towel and allow them to air-dry fully.
Moisture left inside burner holes can cause ignition problems.
Step 8: Reassemble and Test the Flame
Once completely dry, place burners and caps back in position. Turn on the gas and test the flame. It should be steady and blue.
Safety Tips During Gas Stove Burner Cleaning
Always Keep These in Mind
- Never clean burners while they are hot
- Avoid soaking gas outlets or ignition wires
- Ensure burners are fully dry before use
- Do not mix vinegar and baking soda together in closed containers
- Keep the kitchen ventilated during cleaning
Common Mistakes to Avoid
- Using harsh chemical cleaners that leave residue
- Scrubbing too aggressively, damaging burner surfaces
- Ignoring clogged burner holes
- Reinstalling burners while damp
- Cleaning only when performance drops
Regular light cleaning is better than infrequent heavy cleaning.
Real-Life Home Experiences: Gas Stove Burner Cleaning
Story 1: Pankaj Gupta – Lajpat Nagar, New Delhi
Pankaj Gupta noticed that one burner on his gas stove was producing a weak, uneven flame. Cooking time had increased, and the flame sometimes turned yellow. Initially, he suspected a gas issue, but after inspection, he realized food spills and oil residue had clogged the burner holes over time.
He soaked the burners in warm water with baking soda for 30 minutes and gently cleaned the holes using a toothpick. After drying them completely and reinstalling, the flame returned to a steady blue. Pankaj now cleans the burners every three weeks, which has prevented repeat issues and improved cooking efficiency without using chemical cleaners.
Story 2: Meena Joshi – Kothrud, Pune, Maharashtra
Meena Joshi cooks daily for her family and noticed a persistent gas smell after cooking, even though there were no leaks. The burners looked clean from the top, but food residue had accumulated underneath.
She removed the burners and cleaned both sides using a baking soda soak and mild scrubbing. She also ensured the burners were completely dry before placing them back. The gas smell disappeared, and ignition became smoother. Meena now follows a routine of light cleaning every two weeks and deeper cleaning once a month.
Story 3: Arjun Nair – Kazhakkoottam, Thiruvananthapuram, Kerala
Living in a humid coastal area, Arjun Nair found that his gas stove burners frequently clogged due to moisture and grease buildup. During monsoon, ignition delays became common, and the flame often went out unexpectedly.
Instead of replacing parts, Arjun started drying burners thoroughly after cleaning and ensured the kitchen was well-ventilated. He also avoided reinstalling burners when damp. This habit reduced clogging significantly and improved flame stability. His experience highlighted how moisture control is just as important as cleaning in burner maintenance.
Why These Experiences Matter
These real homes faced different issues—clogged holes, gas odor, and moisture-related ignition problems—but all were resolved using simple, natural cleaning methods. The key takeaway is that regular, gentle cleaning and proper drying prevent most gas stove burner problems without the need for harsh chemicals or professional repair.
Do vs Avoid: Gas Stove Burner Care
| Do | Avoid |
|---|---|
| Clean burners every 2–3 weeks | Waiting until flames weaken |
| Use baking soda or lemon | Using bleach or acid cleaners |
| Dry burners fully | Reassembling while wet |
| Clean spills immediately | Letting spills harden |
Myths vs Reality
Myth: Gas burners don’t need frequent cleaning
Reality: Regular cleaning improves flame efficiency and safety
Myth: Strong chemicals clean better
Reality: Natural cleaners work well with proper soaking
Myth: Yellow flames are normal
Reality: Yellow flames often indicate clogged or dirty burners
Kitchen Hygiene and Appliance Care
Gas stove cleanliness is part of overall kitchen hygiene. Grease buildup in one appliance often affects others too. For example, chimney filters above stoves collect oil vapors and require regular maintenance. You can learn more in this guide on
how to clean chimney filter at home without chemicals step by step
Similarly, moisture and detergent residue affect laundry appliances. Regular maintenance helps prevent odors and buildup, as explained in
how to clean washing machine drum at home naturally
FAQs
1. How often should I clean gas stove burners?
Every 2–3 weeks for regular cooking, or weekly for heavy use.
2. Can I clean burners with only vinegar?
Vinegar helps with grease, but baking soda improves cleaning effectiveness.
3. Is it safe to soak gas burners in water?
Yes, as long as they are dried completely before reinstallation.
4. Why is my burner flame yellow after cleaning?
Moisture may still be trapped in the burner holes. Let it dry longer.
5. Can clogged burners increase gas usage?
Yes, uneven gas flow can reduce efficiency and increase cooking time.
Related Natural Cleaning Guides
If you prefer chemical-free home care, you may also find these helpful:
- Bathroom surface maintenance explained in
how to remove hard water stains from bathroom tiles naturally - Upholstery care without machines in
how to clean fabric sofa at home without vacuum cleaner
Simple Summary
Gas stove burner cleaning at home doesn’t require harsh chemicals or complicated tools. With baking soda, warm water, and regular care, you can keep burners clean, flames steady, and cooking efficient. Addressing grease and clogs early prevents performance issues and improves kitchen hygiene.
Making burner cleaning a routine task helps maintain safety, saves time during cooking, and keeps your kitchen functioning smoothly.
From what I have observed in many homes, including relatives’ houses, small cleaning habits are often ignored until problems become noticeable. Regular maintenance using simple home methods makes a big difference in keeping things clean, preventing damage, and avoiding costly repairs later.
References
World Health Organization (WHO)https://www.who.int/publications/i/item/9789289041683
Centers for Disease Control and Prevention (CDC)
https://www.cdc.gov/healthyhomes
United States Environmental Protection Agency (EPA)
https://www.epa.gov/indoor-air-quality-iaq